
Closing a Case in Navigate
Staff and faculty can issue concerns or referrals to a student. Some of these concerns or referrals “open a case,” in various student support offices. Cases are action items and require further interaction on behalf of the support office. These offices routinely reach out to the students to offer assistance. When a student support office reaches out to a student to assist them with their support needs, they record the interactions in the comment section of each outreach and eventually will close the case. To view step-by-step instructions on Case Management processes please view our video or documentation in the Navigate Training Site.
Closing a Case in Navigate
- Login to Navigate
- Click on the Cases Icon
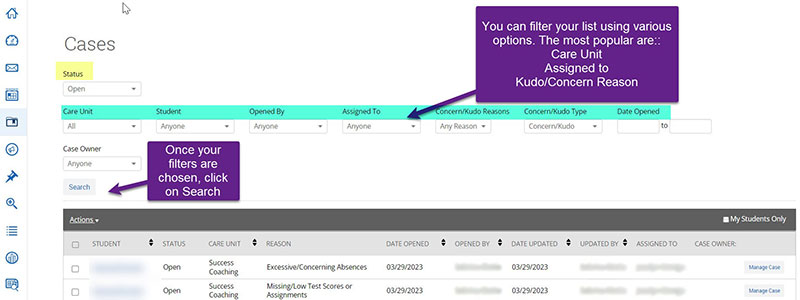
- The Status default is Open.
- Create a custom list by choosing filters.
- Once all filters are chosen, click search.
- Your customized list will appear.
- Once you have a list you can click on the Manage Case button to add comments to the case.
- Once your outreach is complete you can close the case.
You have two options when closing cases
- You can close each case as needed (individual names).
- You can close cases in bulk (if the closing reason is the same).
Select your filters and search.
Now you have a list of student names that have open cases related to the filter you used.
Individual Case Closing
If you want to close a case on an individual student:
- Check off the box in front of the student's name.
- Go to the Action menu and scroll to "Close."

- A Close Case dialogue box will open.
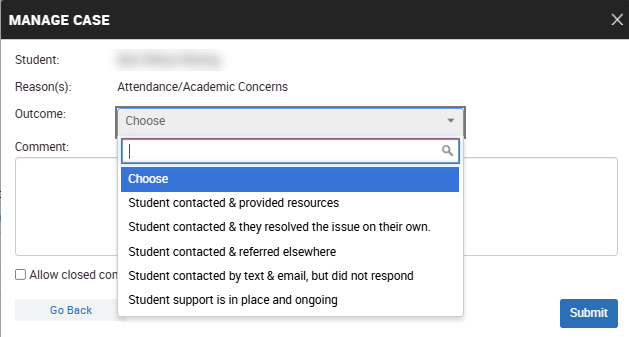
- Choose the outcome for the student from the dropdown list.
- Add a final comment (summary of the results of the outreach to the student)
- Check off the All comment to be seen in email, this will show the raiser of the concern the final notes you entered.
Closing multiple cases, using the same Outcome Reason
There are times when multiple student cases on your lists have the same close case reason. If this is the case, you can close more than one case at a time by using a bulk closing process.
To close multiple cases at once with the same close reason, follow the steps above to get to your list of student cases, using the filters.
- Instead of clicking on one name at a time, you can check off multiple names that are using the same outcome reason.
- Click on Actions, choose Close, and complete the Case Close dialogue box elements, as seen above.
Closing 25 cases at a time, using the same Outcome Reason
You can close 25 names on your list (1 page) at a time by clicking on the check box in front of Student on the gray bar, this will mark off every name on the page (25 names)

- The Case Close dialogue box will show that you are closing 25 cases.
- Choose your outcome (must be the same for all names on the list).
- Write a comment (must be the same for all names on the list).
- Check off Allow closed comments to be shown in the email, to let the issuer of the case see the comments.
- Click Submit.
