
User Resources
Need Help?
To request desk telephone moves, changes or additional services, please submit your request through ServiceNow.
DO NOT MOVE TELEPHONE SETS! Each telephone set is programmed with an Emergency Response Location. If 911 is dialed, the emergency responders are immediately provided with the building and room number. We must know the correct location of the telephone to keep the database current.
How to Use your Cisco Desk Phone
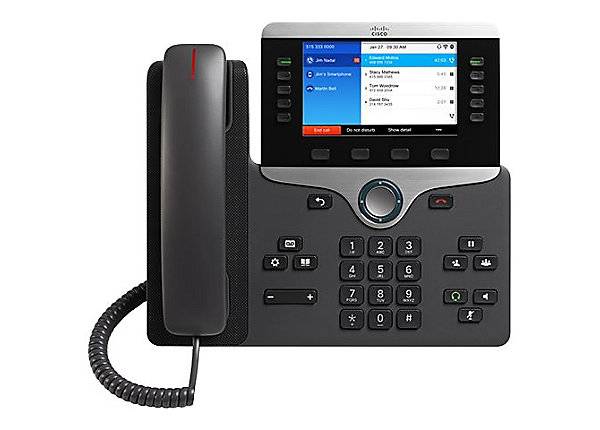

Cisco 7832 Conference Phone Quick Start Guide
Make a Call
There are several ways to initiate a call:
- Lift the handset and begin to dial.
- Press the Speakerphone button and begin to dial.
- Press the Line Button next to the phone number you wish to call from and begin to dial.
- To pre-dial, dial the number first, then choose any of the above options to place the call.
Dialing Procedures Have Not Changed:
For external calls, dial 8 + 1 + area code + telephone number you wish to call.
For internal calls, dial the 4-digit extension number.


Last Number ReDial
To redial the most recently dialed number, lift the handset and press the Redial softkey.
End a Call
There are several options for ending your call:
- Place the handset back on the phone.
- Press the soft key under End Call on the display.
- If you are using the speakerphone, press the Speakerphone button.
- If you are using a headset, press the Headset button.
Answer a Call
When receiving a new call, you will see a few indicators. A flashing light on the handset, a flashing light on the line key and a ringing call icon displays with caller ID information.
You may answer a call using any of the following options:
- Lift the handset.
- Press the Speakerphone button.
- Press the button next to the phone number (the Line button) which is ringing.
- Press the Answer softkey.
Place a Call on Hold
When you place a call on hold, the person on hold will hear music and you will not be able to hear them.
- Press the Hold button (||).
- The Hold icon will appear next to the call on the display of your phone.
- To return to the call, press the Hold button again or press the soft key under the word Resume in the phone display.
Note: Hanging up the handset will not disconnect the call when the caller is on hold. You must first resume the call and then end the call.
Mute Your Audio While on a Call
When you place a call on Mute, you can still hear the caller, but they cannot hear you. Others on the call will not have any indication you have momentarily silenced your end of the conversation.
- Press the Mute button (icon of a microphone with a line through it), which will remain lit while the call is muted.
- To remove yourself from mute, simply press the Mute button again. The button will no longer be lit.
Transfer a Call
When you have a call on your line, you may transfer that call to any internal or external number.
- With the call live on your line (not on hold), press the Transfer button (icon of a person with an arrow). This will put the caller on hold automatically, and you will hear a dial tone.
- Enter the telephone number you wish to transfer to, adding 8 + 1 for an external number.
- You may either press the Transfer button again to immediately complete the transfer, or you may wait for the other person to answer the call, speak to them, then press Transfer again when you are ready.
- If no answer or the call is refused, press the line key to return to the original call. Alternatively, press EndCall then Resume softkeys to return to the original call.
Transfer to Voicemail
To transfer a caller to another user's voicemail,
While on an active call:
- Press the Transfer softkey or the Transfer button (this places the call on hold).
- 2. Press * (asterisk on number pad) and dial the user's 4-digit extension. Press the Transfer softkey or the Transfer button to complete the transfer to the call recipent's voicemail.
- Transfer>*1234>Transfer
Add Another Person to a Call - Conference Calls
Conference Calls allow you to be on a single phone call with up to 6 other people.
- With the first person on an active call, press the Conference button (icon of three people). This will place the first caller on hold.
- Once the second call is answered, press the Conference button again to add the second call to the first. You can now talk to both participants at the same time. Repeat the above steps to add more participants. (maximum 6)
- To view conference participants during a conference call, press the ..(More) softkey and then the Show Details softkey to display a listing of the people on the conference. The person who originated the conference call may remove a participant from a call by highlighting the name using the navigation Cluster and press the Remove softkey.
West Chester University also uses Zoom audio/video conferencing.
Forward All Calls
You may forward calls to another extension or to your voicemail. When your phone is forwarded, it will not ring with incoming calls.
- Press the soft key under Fwd All or Forward All on the display.
- Enter the internal phone number you wish to forward your calls to, exactly as you would dial it directly. To forward to your voicemail, press your Messages button.
- You will see the forwarding phone number on your display.
It is important to cancel the forwarding when it is no longer required. To cancel the forwarding, press the Fwd Off soft key.
Do Not Disturb
Do Not Disturb will still present calls to your phone with a single soft "beep" and Caller ID information to give you the option to answer the call. A red banner will display across the top of the telephone display to remind you that your phone is in Do Not Disturb mode.
Press the ..(More) softkey to go to the 2nd page of softkey options, then the Do Not
Disturb softkey to turn off the phone ringer. The user will see the phone call information
on the screen and the line key will flash, but the ringer will not ring.
Only a single “beep” will be heard
Press the ..(More) softkey to go to the 2nd page of softkey options, then the Turn
off DND softkey to turn off the Do Not Disturb feature.
Corporate Directory/Personal Directory
Corporate Directory:
You can look up the phone numbers of colleagues and dial them directly using the Directory button.
- Press the Directory button.
- Use the Navigation Cluster to scroll down to the Corporate Directory.
- Press the Select button in the center of the Navigation Cluster.
- Search for a colleague by entering some or all of the information in the First Name and Last Name fields, then select Search. Use your keypad to enter letters by pressing the button until the letter you want appears.
- When you locate the person you wish to reach, highlight the name, then lift your handset or press the Speakerphone button to place the call.
Personal Directory:
You may create a personal directory through the Phone Contacts section in the Self Care Portal. This allows you to store phone numbers for personal contacts. Please note each user has one phone contact list. There is no option to link/unlink or share phone contact lists. Please follow the following steps to create a personal directory in the self care portal:
- From Unified Communications Self Care Portal, choose Phones > Phone Settings > Phone Contacts.
- Click the Create New Contact button. The Add New Phone Contact window appears.
- Complete the field details for the contact information and contact methods.
- Click Save.
The first time you attempt to access personal directory from your telephone set, you will be asked for your User ID (your WCU email address in ALL CAPS) and your PIN. Please create a unique PIN in the self care portal under the tab General Settings.
View Your Call History/Recent Calls
To view a list of past received, placed, and missed calls.
- Press the shortcut (looks like a clock) on your phone display. This shortcut indicator will turn red to indicate missed calls. Alternatively, press the Applications button (icon of a gear/wheel) and use the Navigation Cluster to scroll to Recents. Press the Select button in the center of the Navigation Cluster.
- You can sort by Missed Calls or All Calls using soft key options.
- To dial from call history, use the Navigation Cluster to highlight the number you wish to call, then lift the handset or press the Speakerphone button. Press the Edit/Dial soft key (may be on the 2nd menu of soft key options) if you need to edit the number to add 8 + 1 for an external call.
- To view details for a call, highlight the call and press the Details soft key. (may be on the 2nd menu of soft key options). You may also highlight the call and then press the right arrow on the Navigation Cluster to see details for that call.
Change Your Ringtone
You may adjust your ringtone to a unique ringer for easy distinction from your nearby colleagues. If you have more than one line on your phone, you may select a different ringtone for each extension.
- Press the Applications button (icon of a gear/wheel).
- Use the Navigation Cluster to scroll to Settings, then press Select.
- Highlight Ringtone and press the Select button.
- If you have more than one line on your phone, select the line you wish to have a distinctive ringtone.
- You can listen to sample ringtones by scrolling through the list, then selecting Play.
- When you find the ringtone you like, select Set, then Apply to save the changes on your phone.
Default ringtone is Chirp 1 which chirps once to indicate an internal call and twice to indicate a call from an outside line.
Adjust the Brightness of the Display
- Press the Applications button (icon of a gear/wheel).
- Use the Navigation Cluster to scroll to Settings, then press Select.
- Choose Contrast or Brightness.
- Use the Navigation Cluster to increase or decrease the contrast.
Change the Ringer Volume
The volume bar will control the ringer, handset, speaker and headset.
Tap the Volume Bar (- +) to change the volume of the ringer when you are not on an active call, or change the handset volume when you are on an active call.
Adding Speed Dial Numbers
Speed dial numbers can be entered through the Self Care Portal here. For instructions on accessing the Self Care Portal, please refer to that section of the website. Please note that the number of speed dial numbers visible from your phone display depends on how many line keys are available. Contact RamPhone for help entering speed dial numbers.
Make a Call with a Headset
- Plug in a headset.
- Enter a telephone number using the keypad.
- Press the Headset button.
Make a Call with the Speakerphone
- Enter a telephone number using the keypad.
- Press the Speakerphone button.
Lower Your Voice Alert
Users can help keep their phone conversations at an appropriate volume level with the Lower Your Voice alert. When you speak loudly, a warning message displays on the phone screen. You can lower your voice or select Ignore. This feature can be disabled in the phone settings menu.
Listen to Your Voice Messages
Press the Messages button and follow the voice prompts. To check messages for a specific line, press the line button first.
Adjust the Volume in a Call
Press the Volume bar left or right to adjust the handset, headset, or speakerphone volume when the phone is in use.
Adjust the Ringtone Volume
Press the Volume bar left or right to adjust the ringer volume when the phone is not in use.
Change the Font Size
- Press the Applications button.
- Select Settings > Font Size.
- Select a font size.
- Press Save.
Pair a Bluetooth Headset
- Put your bluetooth headset in discoverable mode.
- On your Cisco phone, press the Applications button.
- Select Bluetooth > Add Bluetooth.
- Select your bluetooth headset from the available devices list to pair.
Mark a Call as Spam
You can use the Mark spam feature to reduce the number of unwanted calls you receive. With this feature, you designate a phone number as either a fraudulent call or as a telemarketer call. Fraudulent calls are declined and blocked. Telemarketer calls ring through to you but these calls have the term Telemarketer in the Incoming Call Alert and they have an icon next to them in the Recent Call List.
You can mark active or recent calls. You can view and edit your Spam call list from the Settings menu. The Spam call list can have up to 150 calls.
Recommended Headsets
To order headsets please log into SourcePoint and choose Guided Buying > Shop Company Catalog and then choose the CDWG tile. Enter the part numbers listed below to order.
| Headset | Recommended For | Details |
|---|---|---|
|
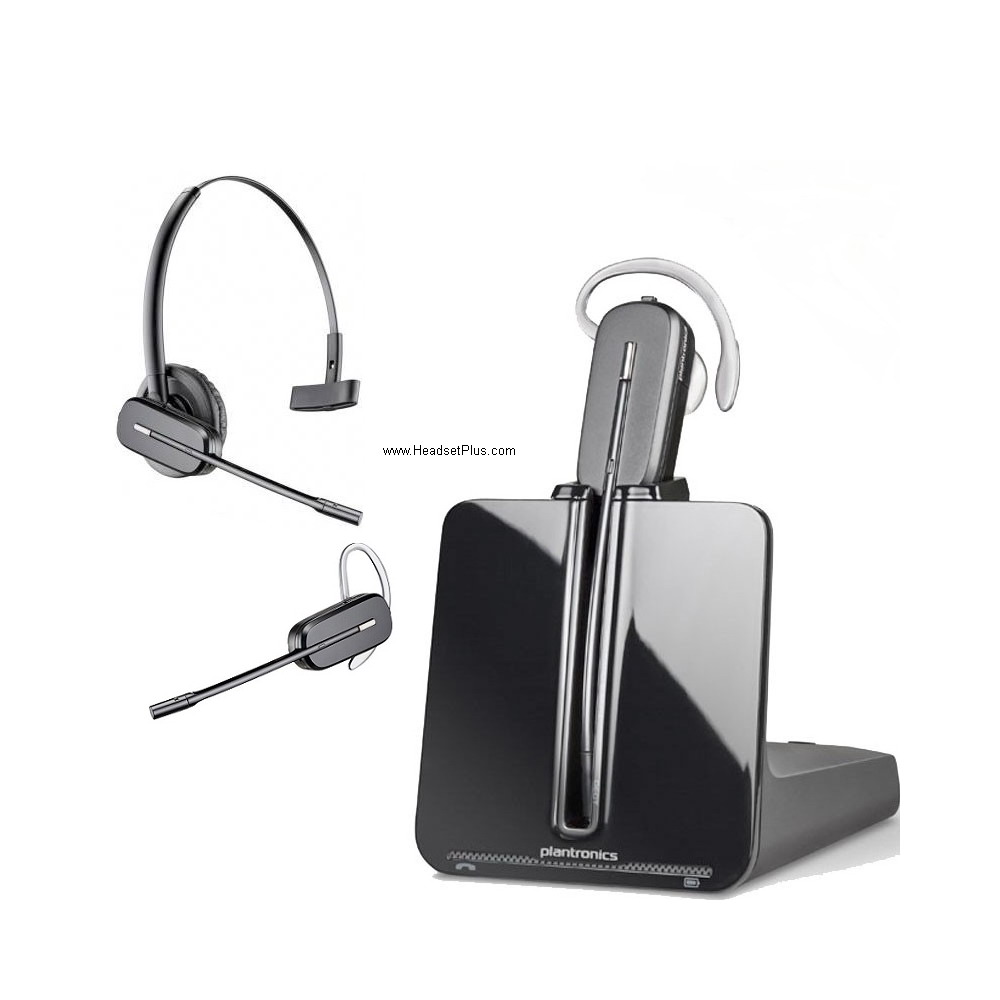
Plantronics CS540 Wireless Headset System
|
Office Use Only Connects to Cisco 8851 telephone set via USB plug and play. |
Part Numbers: (1) Plantronics #84693-01 (headset) (2) Plantronics #202578-01 (APU-72 cable) * order both parts |
|
Plantronics Blackwire 3210 USB Type-A Corded Monaural UC Headset
|
Office or Remote Work
Corded - single earpiece |
Plantronics #209744-101 |
|
Plantroncis Blackwire 3220 USB Type-A Corded Stereo UC Headset
|
Office or Remote Work
Corded - double earpiece |
Plantronics #209745-101 |
|
Plantronics Voyager 5200 UC Bluetooth Headset System
|
Mobility
Connects via bluetooth to computer, smartphone and Cisco desk telephone. |
Plantronics #206110-101 |
|
Jabra Evolve 75
|
Office or Remote Work Dual Bluetooth Connectivity for PC, Smartphone, and Tablet |
Jabra #7599-832-199 |


Cisco Jabber
Important!
Do not use Jabber to make 911 emergency calls. For emergency calls you must use a landline or your mobile phone service.
What is Cisco Jabber?
Cisco Jabber allows you to use your computer or a mobile device to instant message, place voice and video calls, and more all while using your WCU assigned telephone number.
Get Started - Download and Install Jabber
Please Note: Jabber may already be installed on your university-owned pc. Please check before downloading.
To get started, you’ll need to download and install the Jabber application. Select your platform.
Cisco Jabber Demonstration
A short demonstration of Cisco Jabber including tips for getting started using Jabber, is available through the Faculty and Staff Training website. Click the Cisco Jabber icon below and log in with your WCU credentials to access the video demonstration.

Cisco Jabber FAQs and Troubleshooting
Log into Jabber
At the login screen, enter your wcupa.edu email address and click Continue.
When the WCU Single Sign On screen appears enter your wcupa.edu email address and password.
lf you are unable to log into Jabber, please request assistance through ServiceNow.
Enable Call Notifications
It is important that you allow/enable notifications and alerts for the Jabber app in your smartphone settings.
You may also control notifications when using Jabber on your PC or Mac through "settings>notifications".
Set Jabber to Launch At Startup
It is recommended that you set Jabber to launch at startup on your PC or Mac.
Windows PC
1. In the main Jabber window, click the gear icon in the upper-right, and select Options
from the drop-down menu
2. Select the General tab
3. Under the Startup heading, check Start Cisco Jabber when my computer starts
Mac OS
1. Right-click the Jabber icon in your Dock, select Options from the popup menu and enable, both:
Keep in Dock
Open at Login
Disable 'Start A Call with Video'
It is recommended that you turn off "Start A Call with Video".
1. Click the circle containing your initials in the top left corner of your screen.
2. Click "Settings".
3. Click "Audio and Video".
4. Under Video, disable "Send Automatically".
Presence Settings
Set Your Status
Jabber for Windows and Jabber for Mac can adjust your status automatically:
- Your status is set to Away when you lock your computer or it is idle
- Your status is set to show you're in a meeting when meetings are scheduled in your Outlook calendar
- When you're on a call or in a conference, your status reflects that you are on a call
Presence settings are automatically detected through Microsoft Exchange integration and also based on your Jabber login status. You can, however, change your status between Available, Away, and Do Not Disturb from the drop-down menu at the top of the Cisco Jabber window under your name. You can also use a custom status if any of the default statuses do not match your current status. For example, you could create a custom status "Working Remotely" if appropriate.
See the Status of Others
The Cisco Jabber app will show you when your contacts are Available, On A Call, In A Meeting, Away or Offline.
Chat
To start a chat session, select the name of the contact with whom you want to chat and then click on the chat icon. (looks like a conversation bubble)
Group Chat - to add people to a chat conversation,
1. On a PC - click on the 3 dots at the upper right of the chat window and then click on the icon of a person (when you hover over this icon it will read "Open Roster"). Then click +Add People.
2. On an iPhone - click on the chat bubble with a small plus sign at the top right of the chat window.
Place a Call
Calls placed using the Jabber app are made from your WCU telephone number and appear as such to the call recipient.
You can place a Jabber softphone call several ways:
Use your Contact List
Click on Contacts. Hover over the appropriate contact's name and click the green telephone icon.
Search the WCU Jabber Directory
Type the person's name in the "Search or Call" field. Hover over the appropriate contact's name and click the green telephone icon.
Type the Telephone Number
Type the person's telephone number in the "Search or Call" field. Click the green telephone icon next to the "Search or Call" field.
Click to Call
If you are signed into Jabber on your PC, you can click to call using Jabber.
From within an email, you can right click the person's name in the email header and then click "Open Contact Card". Click on the person's telephone number and Jabber will place the call from your pc.
From Outlook Address Book, you can search for the person you wish to call and click on the person's name. Then click "Actions" and then click the person's telephone number. Jabber will then place the call from your pc.
From a website, you may be able to click the displayed phone number and Jabber will place the call from your pc. This will vary depending on the website. Click to call is enabled on the WCU website 'People Search' function.
Receive a Call
You must be logged into the Jabber app to receive a call.
1. Click "Answer" to accept the call.
2. Click "Chat" to open a chat window.
DO NOT CLICK "DECLINE".
Place a Call on Hold
Click the icon with 3 dots in the active call window and select "Hold".
Transfer a Call
1. Click the icon with 3 dots in the active call window.
2. Select "Transfer". (the call is placed on hold - click "resume" to resume the call.)
3. Type the name or phone number of the person to whom you wish to transfer the call in the search box.
4. Select the person or number when it appears in the search list. (You are connected to that number.)
5. Press "transfer" to complete the transfer.
6. Click the red telephone icon.
Forward Your Calls to Voicemail
Forward Calls to your WCU voicemail in Jabber for PC:
1. Click the "Call Settings" button in the bottom right corner of your Jabber hub window. It is a small icon that looks like a computer monitor. It will be either green or red.
2. Click the "Forward Calls" drop down to select Voicemail.
3. To turn off call forwarding, select "None" from the Forward Calls drop down.
Forward Calls to your WCU voicemail in Jabber for PC:
To forward your calls to your WCU voicemail:
1. Click the circle containing your initials in the top left corner of your screen.
2. Click "Settings".
3. Click "Voice Message".
To unforward and resume receiving calls, follow steps 1 & 2 above, then click "Do Not Forward Calls".
Forward Your Calls to another Number
Forward your Calls in Jabber for iPhone
1.Click the circle containing your initials in the top left corner of your screen.
2. Click "Settings"
3. Click "Call Forwarding"
4. Click "New Number"
5. Click "Forward To"
6. Enter the phone number you wish to forward to.
Note: if you forward your calls to an external number, any missed calls (busy or no answer) will not go back to your WCU voicemail box. Instead those calls will be directed to the voicemail associated with the external phone number.
To unforward calls, follow the steps 1 & 2 above then click "Do Not Forward Calls". This should be your default selection.
Forward Your Calls on Jabber for Mac
1.
Click your profile button in the upper left corner (this will either be your picture
or your initials).
2. Click "Preferences"
3. Click the "Calls" button in the tool bar at the top of the Accounts Preferences window.
4. Select the "Call Forward" tab.
5. Click the "Forward Calls" drop down to select the number to forward your calls to: (You can add new numbers by clicking the + at the bottom left of the screen.)
6. To turn off call forwarding, select "Do Not Forward Calls" from the Forward Calls to drop down.
Forward Calls on Jabber for Android
1. Click your profile button in the upper right corner (this will either be your picture or your initials).
2. Click "Settings".
3. Click "Call forwarding".
4. On the Call forwarding screen, you can choose to forward calls to Voicemail or enter a new number to forward calls to.
5. To turn off call forwarding, select "Do not forward calls" form the Call Forwarding screen.
Forward Calls in Jabber for PC
1. Click the "Call Settings" button in the bottom right corner of your Jabber hub window. It is a small icon that looks like a computer monitor. It will be either green or red.
2. Click the "Forward Calls" drop down to select Voicemail or add a new number to forward calls to.
3. To turn off call forwarding, select "None" from the Forward Calls drop down.
Troubleshooting
Most troubles experienced using Jabber are quickly resolved by signing out of the app and then signing back in. We recommend trying the following in this sequence:
1. Check your connection status:
For Windows: In the client, select the gear settings icon at the top right of the Jabber window, then Help > Show connection status. If softphone status indicates you are not connected, sign out and restart the application.

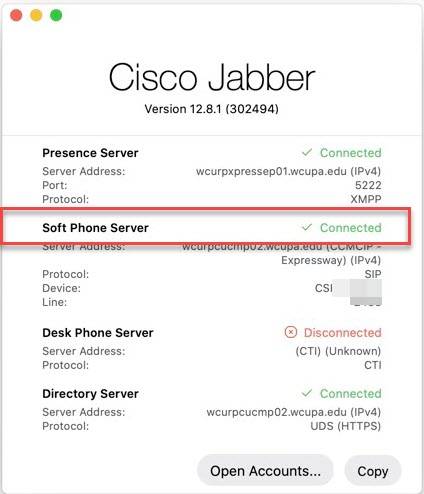
For Mac:
Select Help > Show Connection Status. The server connection status window opens.

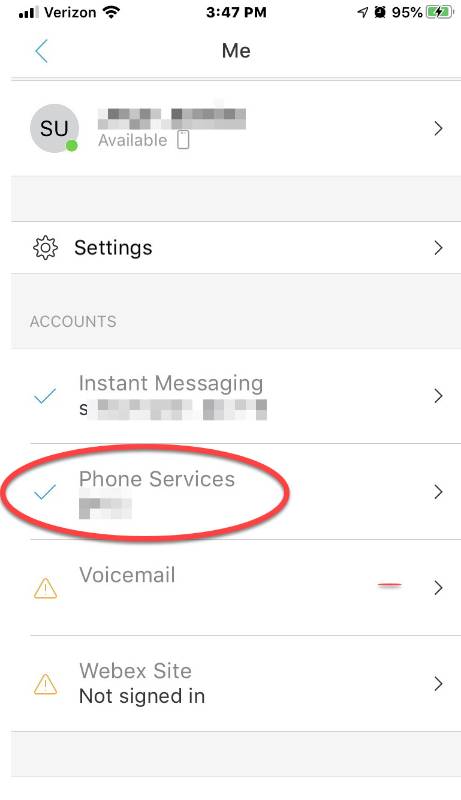
For Android/Apple: click the profile button (contains your initials) and under Accounts, look for Phone Services. If there is not a green checkmark beside phone services, you have lost your connection. Sign out and restart the application.
2. Close/exit the Jabber app and then restart the application.
3. Reboot your device.
4. Reset Jabber
You may choose to Reset Jabber. Please note that you may lose your call/chat history but it should not affect your Contact List..
From the sign-in menu, click "Reset Jabber".
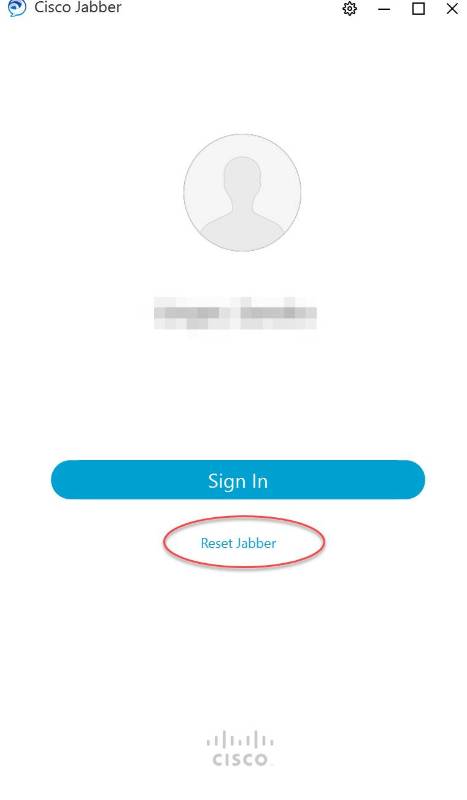
**After you Reset Jabber, some settings revert to default. You will need to "re-do" some settings such as "Never Start Calls with Video", "Launch Jabber at Computer Startup" and also your audio settings.
5. On a smart phone - enable Differentiated Service for Calls. This setting is found in Settings>Audio and Video.

If you require further assistance, please submit a ticket through ServiceNow.
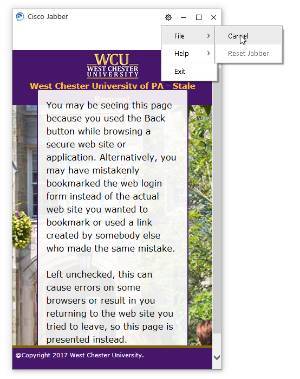
Single Sign On Error
If you receive a stale single sign on message while attempting to sign into Jabber, please click the gear icon in the single sign on screen and then "File" > "Cancel". This should clear the issue.
One-Way Audio (Can't Hear the Caller or Caller Can't Hear You)
This problem is easily fixed by signing out of Jabber and then signing back in.
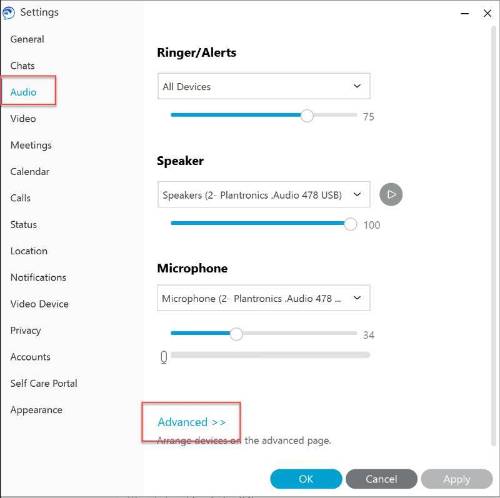
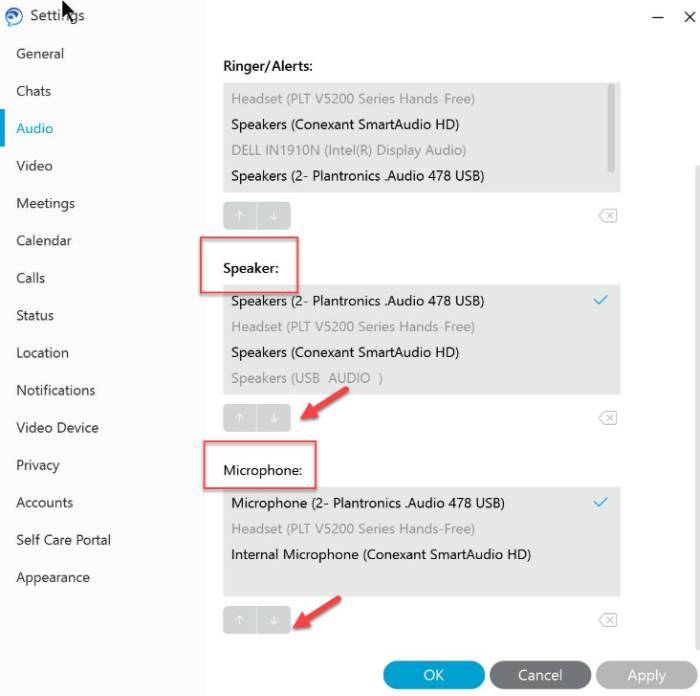
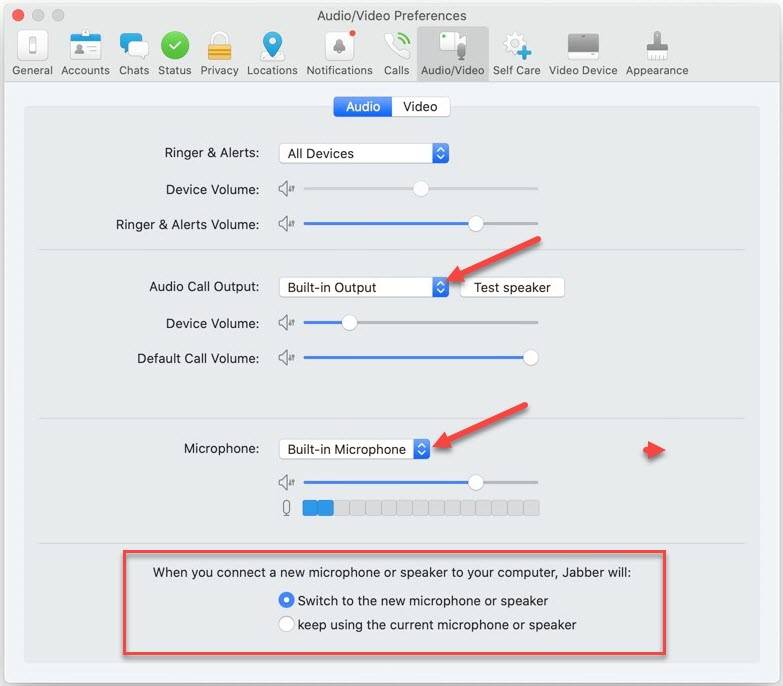
Jabber using wrong speaker or microphone
You can adjust and prioritize your speaker or microphone preferences through Jabber audio settings:
On a PC
Go to Settings > Audio > Advanced. Use the up/down arrows to select and prioritize the speaker and microphone you prefer Jabber to use.
On a Mac
I'm not getting any calls on Jabber
You may have lost your connection. Please sign out of Jabber and then sign back in. (See Troubleshooting FAQ for information on how to check your connection status)
Please note, you must be signed into Jabber to receive calls. On a smartphone, you must have the Jabber application open and be signed into Jabber.
My calls are going directly to voicemail
Please check that your calls are not forwarded to voicemail. Otherwise, you may have lost your connection to Jabber. Please sign out of Jabber and then sign back in.
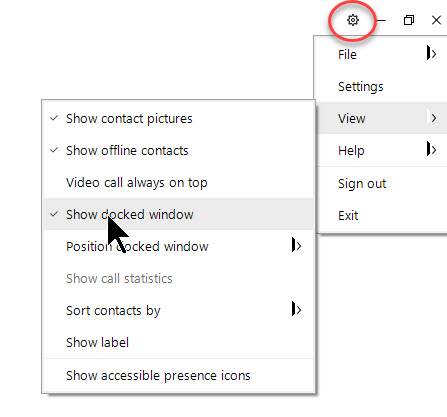
How to Suppress the Jabber Docked Window
To remove the Jabber docked icon from your desktop:
1. The gear icon can be found at the top right side of your pc screen
2. > View
3. Uncheck “show docked window”
What if I do not have a WCU phone number?
Any employee who has a WCU assigned telephone extension is set up to use Jabber.
If you don’t have an existing WCU number, you will need to request a new number and provide a cost center when you submit your request. Normal line charges will apply. Please submit the request through ServiceNow.
Jabber User Guides
For more information on support and to access user guides, please view the Cisco Jabber: Support & User Guides knowledgebase article.
Cisco Unity Connection Voicemail
New! Cisco Unity Connection is a robust unified messaging and voicemail solution that provides users with flexible message access options. It lets users access and manage messages from an email inbox, Cisco Jabber, Cisco Unified IP Phone, or smartphone.
Cisco Unity Connection Menu Flow Chart
First Time Access Instructions (Enrollment)
These are the system prompts for first time access. Please do not hang up until you have successfully completed enrollment.
The system announces “Welcome to Cisco Unity Connection. Please take a moment to personalize or update your settings”.
- Recorded Name
- Personal Greeting – (note: we moved your personal greeting over to Cisco Unity from the old voicemail system so this step is optional.) You may opt to keep your original personal greeting.
A basic voicemail greeting should be:
-
- Brief, professional, free from background noise
- include your name & department
- Include a statement that you are unable to take the call
- Include an invitation to leave a message
- Do not ask callers to email you since your voice messages will be delivered to your email automatically.
- Do not provide your personal cell phone number to callers. Callers may reach you at your campus extension through the Jabber application.
- Choose a new PIN (6 or more digits) – set a new PIN to protect your voicemail box
- Change Directory Listing – you can choose to be Listed or Not Listed. If you are listed,
callers can look up your name and extension wherever Dial By Name is built into an
auto attendant menu.
4. You have finished enrollment
How to Access Cisco Unity Voicemail (3 ways)
If this is your first time accessing your voicemail box, you will need to reset your PIN. Please see FAQ - "First Time Access Instructions"
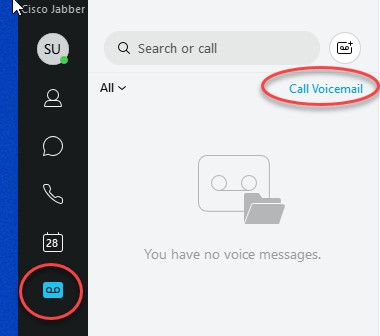
From Jabber
Click the messages button on your Jabber console or dial 2232.
The system asks for your PIN. This is the PIN you set during initial setup (see FAQ - "First Time Access Instructions".)
Unity Voicemail using Jabber on pc:
Unity Voicemail using Jabber on iPhone:

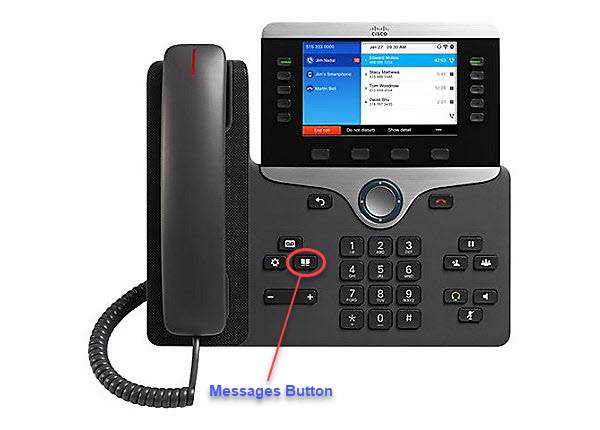
From your Desk Phone:
Press the messages button on your desk phone or dial 2232.
The system asks for your PIN. This is the PIN you set during initial setup (see FAQ - "First Time Access Instructions".
From Someone Else's Desk Phone
1. Dial 2232 or press the messages button on the desk phone.
2. When the system asks for your PIN, press * (star key).
3. The system asks for your ID. Enter your 4-digit WCU phone extension then press # (pound key).
4. The system asks for your PIN. Enter the number, then press # (pound key).
5. Follow the voice prompts to manage your voicemail. For example:
To send a message, press 2.
To manage your messages, press 3.
To manage your settings, such as your voicemail greeting or recorded name, press 4
To exit the system or pause a voicemail playback, press * (star key).
From outside WCU or from your cell phone (not using Jabber app)
Dial the voicemail access number: 610-436-2232.
1. When the system asks for your ID, enter your four-digit WCU phone extension then press # (pound key).
2. The system asks for your PIN.
3. The system says that your PIN has expired and prompts you to change your PIN.
4. After you change your PIN, follow the voice prompts to manage your voicemail. For example:
- To send a message, press 2.
- To manage your messages, press 3.
- To manage your settings, such as your voicemail greeting or recorded name, press 4.
- To exit the system or pause a voicemail playback, press *.
Can l receive my voicemail messages in my email inbox?
Can I listen to my voicemail messages in Jabber?
What are the menu options in the Cisco Unity Voicemail system?
How do I record a standard greeting and an out of office greeting?
The two greetings most users set are: Standard Greeting and Alternate Greeting.
1. Standard greeting plays during normal business hours or when no other greeting is on. It is the message that callers hear before they leave you a message. By design, the standard greeting cannot be turned off.
2. Alternate Greeting Turn on this greeting for a specific time period when you want to provide information about special circumstances, such as when you are on vacation. (For example, "I will be out of the office until <date>.") By default the Alternate Greeting is off, however when enabled the default greeting is “Sorry (your name) is unavailable”.
First, access your voicemail box using one of the options described above in the FAQ titled "How do I reach my voicemail in the new Cisco Unity system?".
Option 1: Record your personal greeting (standard greeting)
Your personal greeting lets callers know that they have reached the correct mailbox and hear a brief message from you. To record your personal greeting:
1. Connect to your mailbox.
2. The system responds with the status of any messages in your mailbox and prompts you with the Main Menu selections.
3. Press 4, Setup Options.
4. Press 1, Change Your Greeting.
5. Press 1 to re-record your greeting.
6. Record your greeting at the tone.
7. Press # after recording your personal greeting. The system plays back your recording for your review.
Option 2: Record your alternate (extended absence) greeting
Your alternate greeting lets callers know that they have reached the correct mailbox and hear a brief message from you. Often, this message specifies when you will return and provides contact information for the person or people who can help callers during your absence. To record your alternate greeting:
1. Connect to your mailbox.
2. The system responds with the status of any messages in your mailbox and prompts you with the Main Menu selections.
3. Press 4, Setup Options.
4. Press 1, Change your greeting.
5. Press 2, Turn on alternate greeting.
6. Set the end date and time for your alternate greeting:
§ Press 1 to set the end date and time.
§ Press # to leave the alternate greeting on indefinitely.
§ Press 0 for help.
7. Press 1 to record your alternate greeting.
8. Press 2 to turn off your alternate greeting, if needed.
9. Record your greeting at the tone.
10. Press # after recording your greeting. The system plays back your recording for your review.
11. Press 1 to re-record your alternate greeting, if needed.
12. To exit, press *.
Last: Select your greeting
1. Connect to your mailbox.
2. The system responds with the status of any messages in your mailbox and prompts you with the Main Menu selections.
3. Press 4, Setup Options.
4. Press 1, Change Your Greetings.
5. The system states which greeting is in effect, and gives you options to manage it.
6. Select one of these options:
1 Re-record your greeting
2 Turn on alternate greeting
3 Edit other greetings
4 Play all your greetings
0 Get help
* Exit
How to Record Your Name
Record Your Name
Record your name to let callers know that they have reached the correct mailbox. To record your name:
1. Connect to your mailbox.
2. The system responds with the status of any messages in your mailbox and prompts you with the Main Menu selections.
3. Press 4, Setup Options.
4. Press 3, Change Preferences.
5. Press 1, Change Recorded Name.
6. Record your name at the tone.
7. Press # after recording your name. The system plays back the recording.
8. To save the recording, press *.
Contact Your Administrator Error Message
If you see this message in voicemail through Jabber, sign out of Jabber and sign back in.
Cisco Finesse Contact Center
Used by WCU student services groups, Cisco Finesse is a contact center platform that provides an agent and supervisor desktop through your web browser. Finesse connects you to your contact center's phone queue. You must be connected to a secure VPN connection in order to use Finesse.
Together, Jabber and Finesse allow you to answer phone calls for your contact center while working remotely.
WCU Finesse AGENT Quick Start Guide
WCU Finesse SUPERVISOR Quick Start Guide
Log into Finesse
3 Steps:
1. Sign into Jabber
2. Connect to Cisco AnyConnect VPN (authenticate with DUO Multi-factor Authentication)
3. Log into Finesse
- Open a web browser and go to https://wcurpconctrp01.wcupa.edu:8445
- Sign in using your WCU credentials
- Enter your assigned Agent Extension
Ready/Not Ready
Once logged into Finesse, make yourself "Ready" to receive calls. To no longer receive contact center calls, make yourself "Not Ready".
Answer A Call
When a call is presented, your state will be changed to "Reserved".
Press "Answer" on the call notification. The call will be answered using the Jabber softphone technology working in the background.
End A Call
Either press the "End" button in Finesse or hang up in Jabber.
Hold A Call
While on a call, in Finesse press the Hold button. To resume a held call, press the "Retrieve" button in Finesse.
Transfer A Call
While on a call, in Finesse use "direct transfer" to immediately send a call to another number, or "consult' to first speak with the party you are transferring the call to.
Agent CSQ Statistics
This section shows what queues you are a part of and if any calls are in queue.
Agent Team Summary Report
This section shows all members of your team and their current state (ready or not ready). Ready means they can take calls. Not ready means they cannot take calls.
Agent Statistics
Shows your current statistics since login.
Call Notifications
I'm getting a call notification from both Jabber and Finesse. Can I turn off notifications for Jabber?
It is not recommended unless you only answer contact center calls. By turning off Jabber notifications, you will not receive ANY Jabber incoming call notifications and, therefore, you will miss calls received on your personal phone extension. You can, however, move the notifications pop-up to the bottom left corner of your screen. That way the Jabber pop-up is on the left and the Finesse pop-up is on the right.
Settings > Notifications > Show incoming call notifications from the bottom left corner>Apply>OK
What is a Cisco Finesse popover or "toaster notification?
Finesse displays a notification with the incoming call details. If the Finesse desktop window or tab is inactive, click the notification to restore the Finesse desktop. Note: Internet Explorer does not support toaster notification.
I have a meeting to attend. What should I do about my calls in Finesse?
If you leave your desk for any reason, or if you are servicing a walk-in client, make yourself “Not Ready”.
Why do I need an agent extension?
An agent extension is required to log in to Finesse and also to receive calls from the queue.
Do not publish your agent extension and do not ask clients to call you on your agent extension. Your agent extension is reserved for handling calls that originate in the call queue.
Will I still have my personal extension?
Yes, your personal extension and its associated voicemail box will still be assigned to you. Agent extensions cannot have voicemail.
If an agent is in "Ready" state and makes a call on their personal extension, what happens?
Finesse will automatically put the agent in a ‘Not Ready’ state if the agent is on a call on their personal extension.
How soon will I be presented with another call after I finish the call I'm on?
There is an automatic 20 second interval between calls.
What is an agent state?
An agent state indicates the current state of an agent. For example, Ready, Not Ready, Sign Out.
We have a new employee. What needs to be done to get them setup to answer contact center calls in Finesse?
Cisco Self Care Portal
The Cisco Self Care Portal provides access to advanced features such as personal directory, speed dial, and call forwarding (accessible from the WCU network or via VPN connection). Log in using your WCU user name and password. We recommend bookmarking this page for easy access. The homepage contains a menu along both the top and the left pane. Upon first login you must create a PIN under the General Settings tab (Phone Services PIN).
Personal Directory
Phone Contacts (Personal Directory)
In addition to the WCU contacts available to you through the Corporate Directory on your Cisco phone, you may wish to build your personal directory which can be accessed through the Personal Directory on your phone. Remember to program numbers as you would dial them from your phone including 8+1 for external numbers. Also note that the first time you access Personal Directory from your phone set, you will be prompted for a User Name (your WCU email in ALL CAPS) and your PIN. You may create or change your PIN in the Self Care Portal under the General Settings tab (Phone Services PIN).
PLEASE NOTE: You must be connected to the
Speed Dial
Please note that speed dial entries are limited to the number of available line keys on your phone. You may be interested in setting up speed dials on your phone. To do so, click on the Phone Settings tab which offers several options including Speed Dial. To program speed dial numbers, click on the Speed Dial numbers link. Enter the speed dial number just as you would dial it from your phone. Remember to include 8 + 1 for external dialing. Label the speed dial and choose which speed dial number you wish to associate with this number. Click on Save and the system will display a successful message at the top of the window. This speed dial is now listed in your speed dial list. To edit your speed dial numbers, click on the pencil icon, make any desired changes and click on the Save icon. You may also use the "X" icon to delete a speed dial number. The system will prompt you with a confirmation message to avoid any mistakes.
Call Forwarding
Call Forwarding is easily enabled from your Cisco 8851 telephone, however you may also set Call Forwarding through the Self Care Portal. You may forward all your calls so that they will ring at another device for temporary coverage or forward to voicemail so that the phone will not ring for you or your caller. To forward all calls, click the Call Forwarding menu. Click on the Forward all Calls option and enter the number as you would dial it from your phone, using the 4 digit extension for on campus and including 8+1 for external numbers. Each number you use under the drop-down will be available for future use. Once you click save, the "Calls Forwarded Successfully" message will confirm this setting. The Forward indicator will also be visible on your phone. You may remove call forward through either the Self Care Portal or your phone. You must be connected to the WCU network to access the Cisco Self Care Portal, it is not accessible off campus. To set Call Forwarding remotely, please do so through the Cisco Jabber app. Settings > Call Forwarding > New Number.