
Class Registration: Registering Students in a Class
Last edit date: 1/29/26
Audience: Faculty and Staff
Purpose: This guide provides instructions for how to register students for classes in RamPortal. It also covers registering students from a waitlist, removing a course from a student’s schedule and understanding lab, lecture, and corequisite requirements.
| Contents |
|---|
| Navigation |
| Search for Classes |
| Register a Student in a Class |
| Register a Student from a Waitlist |
| Remove a Course from a Student's Schedule |
| Registration Errors |
| Lab, Lecture, and Corequisites |
Navigation
- If you are working off campus, connect to the WCU VPN.
- Login to RamPortal using your WCU Single Sign On (SSO).
- Locate the Faculty Center card on your home page.
- Select My Advisee Information and choose View Student Profiles and List of Advisees in the dropdown.
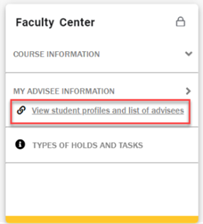
Fig 1 - Select a Term from the dropdown.
- Search for the advisee using their ID, email, or name and click View Profile.
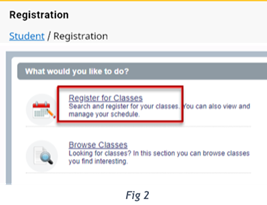
- From the Student Profile page, select Registration from the left-hand menu.
- Click Register for Classes (Fig 2).
- If prompted, review and accept the Financial Terms and Conditions agreement.
- Select your role as Faculty and Advisor, choose the appropriate Term from the dropdown, and search for the student. The student’s Register for Classes page will display.
Search for Classes
From the student’s Register for Classes page, use the steps below to search for a class.
- On the Find Classes tab (Fig 3), enter your search criteria. Here are some examples of search criteria
to narrow results. Multiple criteria can be used at the same time to refine results
even further.
- Subject: Enter three-letter course subject code (e.g., ECO, MAT, GEO) and choose from the dropdown list.
- Course Number: Optional but helps narrow results to a specific class.
- Campus: Allows to filter campus location or online.
- Attribute: Use to search for General Education classes that meet program requirements. For example, selecting Arts Distributive Requirement will display all the classes offered in the selected semester that will fulfill the Art General Education requirement.
- Advanced Search:
- Meeting Days and Time: Filter based on student availability.
- Instructor: Search for classes taught by a specific faculty member.
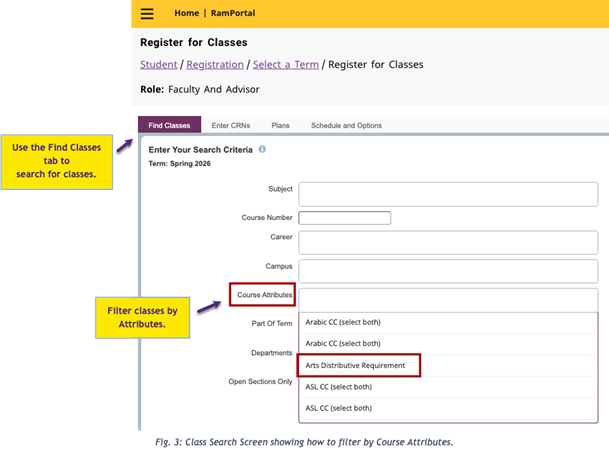
- Click Search
- Once the search results load, scroll through to find the best fit.
- Review the Enrl Totals column for seat and waitlist availability.
- A red FULL icon indicates the class is closed. Some closed classes may have a waitlist students can join.
- Hover over icons for details, such as reserved seating and remaining waitlist spots.
- Click on the Class Title for additional details, such as:
- Course Description
- Prerequisites
- Corequisites
- Review the Enrl Totals column for seat and waitlist availability.
Register a Student in a Class
- Click the Add button on the far-right side of the row for the section you want. This moves the class down to your Summary panel. If you don’t see the Add button, scroll all the way to the right or zoom out.
- In the Summary panel at the bottom right (Fig 4), review the classes you added. The Status column shows whether a class is Registered, Waitlisted, or Pending. Classes you just added will show as Pending until you click Submit.
- Click Submit in the bottom right corner to complete the registration process.
- Review the confirmation message on the screen to confirm your action was successful.
NOTE: Make sure the classes show Registered or Waitlisted before leaving the page. If a class is Pending, the student is not registered.
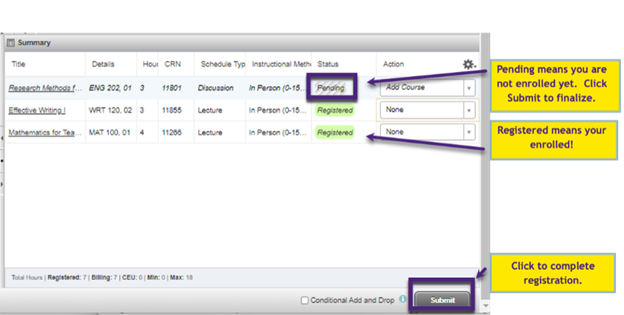
Fig. 4: Summary panel showing a newly added course with the status of Pending.
Register a Student from a Waitlist
From the student’s Register for Classes page, follow the steps below to register a student from a waitlist when a seat becomes available.
- Locate the Waitlisted course in the Summary panel at the bottom right of the page (Fig 5).
- In the Action column, select Registered from Waitlist from the dropdown menu.
- Click Submit to complete registration.
- Verify the course status now shows Registered.
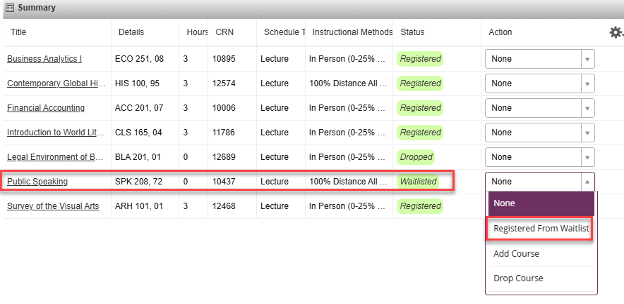
Fig 5
Remove a Course from a Student's Schedule
From the student’s Register for Classes page, use the steps below to remove a course from a student’s schedule.
- In the Summary panel at the bottom right of the page, locate the course you want to remove.
- In the Action column, select one of the following options:
- Drop Course for classes with a Status of Registered or Waitlisted
- Remove for classes with a Status of Pending
- Click Submit to apply the change.
- Verify that the course Status updates to:
- Dropped or Deleted for Registered or Waitlisted Courses, or
- The course is removed from the Summary panel for Pending courses.
Registration Errors
If your registration attempt is unsuccessful, the Status column will display an error after you click Submit.
- Hover over the error details to view the explanation. Errors also appear at the top of the page.
- For help identifying and resolving common issues, see Class Registration: Resolve Registration Errors webpage.
- For assistance with Level Overrides and Overload Credit Enrollments complete the Registration or Student Records Help form. For all other overrides, please contact the Department offering the class
for assistance.
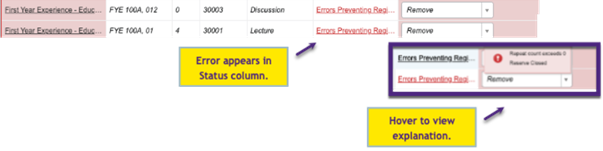
Fig. 6: Registration Error with a hover tooltip explanation.
Lab, Lecture, and Corequisites
How to Register for a Course with a Lab or CoRequisite Video
- In RamPortal, labs and lectures, and corequisites are not linked. There are two different courses, and you must add each course to the student’s schedule if the lab is required. You will not be prompted to add the lab to the lecture.
- Typically, the lab sections have an “L” after the course number. Example below: BIO 111 and 111L.
- Please view the video using the link above for additional information.
For additional assistance, submit a ticket for support.