
Advising: Assign and Update Student Advisors
Last edit date: 1/13/2026
Audience: Department Chairs, Graduate Coordinators, and Department Staff
Purpose: Use this guide to assign, change, add, or remove a student’s academic advisor in RamPortal
using the SGAADVR form.
| Contents |
|---|
| Navigation |
| Assign a New Advisor |
| Change an Advisor |
| About the Maintenance Button and Terms |
| Assign an Additional Advisor |
| End or Remove an Advisor |
| Search for an Advisor |
Navigation
- If you are working off campus, connect to the WCU VPN first.
- Login to RamPortal using your WCU Single Sign On (SSO).
- Locate the Academic Department Resources card on your home page.
- Select the Updating Student Advisors (SGAADVR) button. See Fig 1.
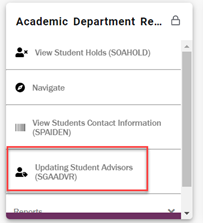
Fig 1 - Enter the Student ID, the Term the advisor assignment is effective, and then select
Go!

Fig 2
- You are now ready to Assign, Change, Add Additional, or Remove Advisors
Assign a New Advisor
Use this when the student does not currently have an advisor. See Fig 3.
- In the Advisor ID field, enter the advisor’s ID. If you don’t know the ID, see Search for an Advisor at the end of this guide.
- Select the Advisor Type and click OK.
- Select the Primary Indicator if this is the student’s primary advisor. This box should be checked when entering the major advisor for the student’s primary program.
- Verify Term is correct and select Save.
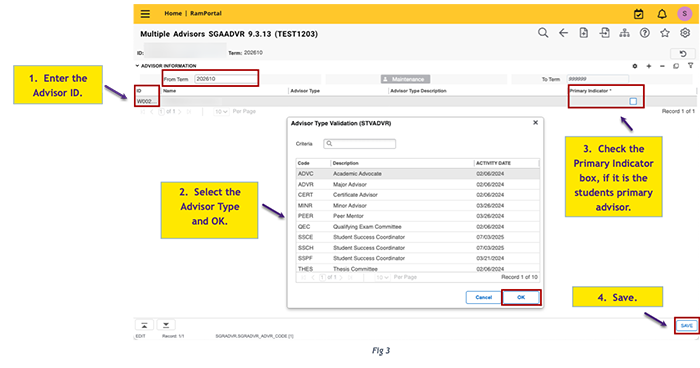
Fig 3
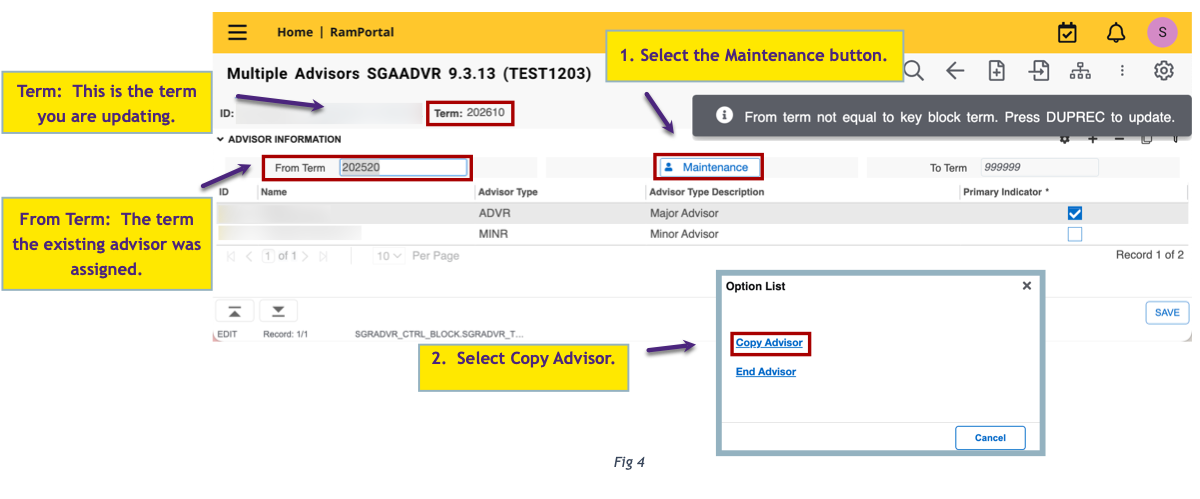
Change an Advisor
Use this when the student already has an advisor, and you need to replace them. See Fig 4 and 5.
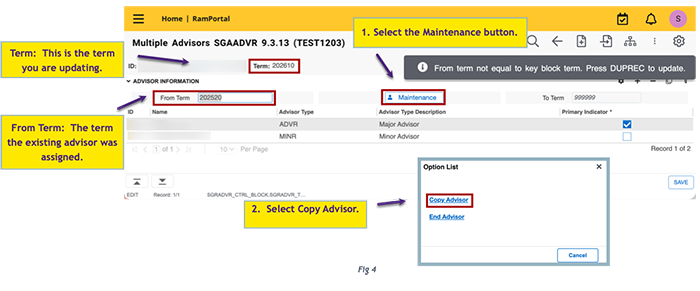
- Select the Maintenance button if it is blue, and then select Copy Advisor. This pulls the existing advisor forward to the term that you are updating. See
the next section for more details About the Maintenance Button and Terms. If the Maintenance button is grey, skip to Step 2.
- Remove the existing advisor by placing your cursor in the Advisor ID field and select the Remove (-) icon (Fig 5).
- To replace the advisor, place your cursor inside the Advisor ID field and enter the new advisor’s ID. If you don’t know the ID, see Search for an Advisor at the end of this guide.
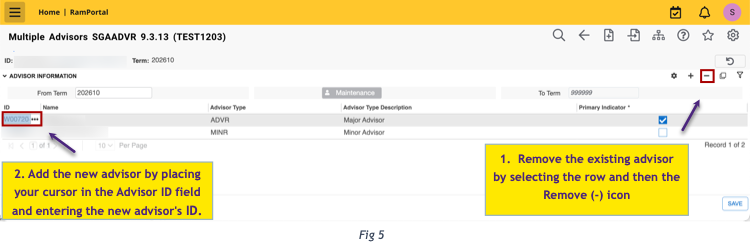
- Select save.
About the Maintenance Button and Terms
This information applies when updating or changing an existing advisor.
- If you see a message that says “From term not equal to key block term. Press DUPREC to update” (see Fig 4), this means that the advisor record you are viewing is from a previous term, not the term you entered. Clear the message by clicking on the notification, then select Maintenance > Copy Advisor (or End Advisor, if you are removing the advisor).
- If the Maintenance button is blue, the advisor record is from a different term than the one you entered. As shown in Fig 4, the Term and From Term are different. You must copy the record forward before you can make any changes.
- If the Maintenance button is grey, the advisor record already matches the term you entered, and you can make changes directly on this screen.
- After you select Maintenance > Copy Advisor, the Term and the From Term will now match. This confirms the record is now set for the term you are updating. See Fig 5.
Assign an Additional Advisor
Use this when the student already has an advisor and needs an additional one like a minor or secondary advisor.
- Select the Maintenance button if it is blue, and then select Copy Advisor. This pulls the existing advisor forward to the term that you are updating. See Fig 4. If the Maintenance button is grey, skip to Step 2.
- Select the Add (+) icon to add a new row. See Fig 6.
- Enter the additional advisor’s ID. If you don’t know the ID, see Search for an Advisor at the end of this guide.
- Select the Advisor Type.
- Select Save.

Fig 6
End or Remove an Advisor
Use this when the student should no longer have an advisor for the selected term.
- Select the Maintenance button if it is blue and then End Advisor. If the Maintenance button is grey, skip to step 2.
- Remove the advisor row by clicking in the Advisor ID field and selecting the Remove (-) icon. See Fig 6.
- Select Save.
A note about ending advisors:
- After you select End Advisor, the pop-up window will close, and it may appear that no changes were made.
- When you select Save, you may see a message that says No changes to Save.
- While both of these actions are misleading, the system has saved your changes.
- After you leave the student record and return to it, you should now see that no advisor is listed for the selected term.
Search for an Advisor
Use this when you don’t know the advisor’s id.
- In the Advisor ID field, select the Search (three dots).
- On the next screen, verify that the correct Term is displayed in the Term field and select Go. (Nothing needs to be entered on this screen.)
- On the search screen, enter the advisor’s Last Name and/or First Name and select Go.
- Locate the advisor in the results and click select to return to the advisor form. The advisor’s ID will populate automatically.